Blog Home > Tips and Tricks, Videos, Wood Finishing
It’s so easy to stain and dye ash to create the color you want because it’s so pale in color and because it doesn’t blotch. Sure, you could finish this wood with a totally clear finish no problem. But that’s not what we’re going to share today. Instead, let’s look at how you can get dramatic and amazing finishes with a very simple 3-step finishing technique: color, sealer, contrast. Take a look:
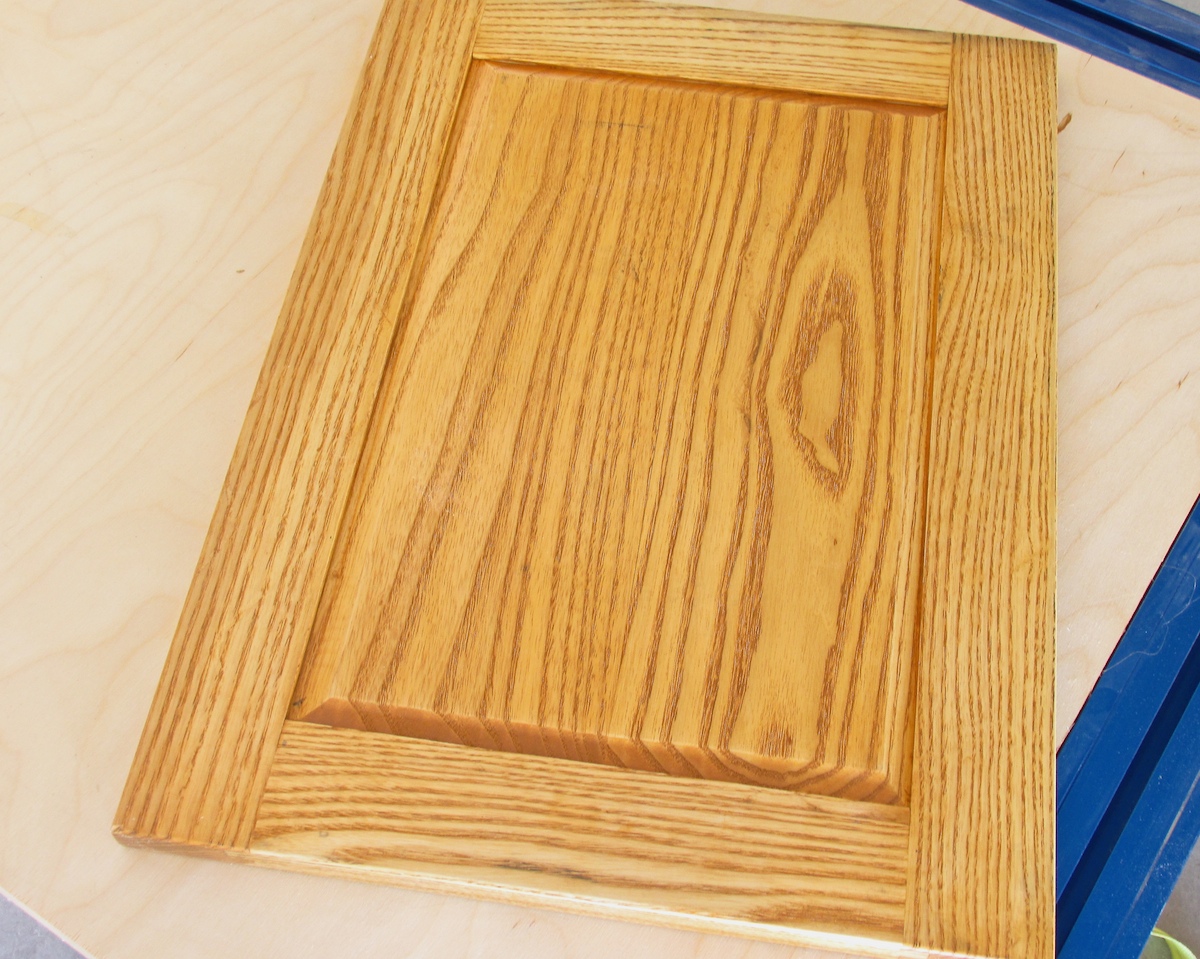
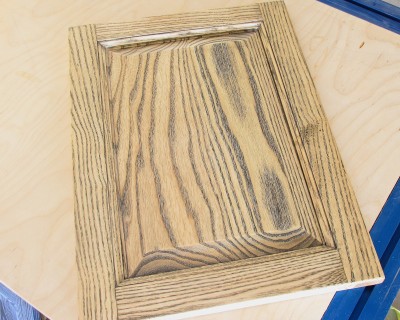
Finish #1 Basic Stained Ash

Ash stained with a Maple colored oil stain. Notice how well ash takes the stain. But there’s still a lot more you can do with ash.
You might not find a wood that stains as well as ash does. Its natural pale color allows it to agree with just about any color you can imagine, and basic oil stains take to it evenly without the need for a conditioner or a washcoat.
Products used: Old Masters Maple Wiping Stain
A successful stain job starts with a well prepared surface. Ash should be sanded to 220 or perhaps 320 grit, but no finer. A general rule about staining is that there’s a sweet spot at which a wood is sanded to a just-right grit. If you’ve sanded to a too-coarse grit the stain highlights scratches, and if you’ve sanded too fine the wood won’t accept the stain very well. Ash is forgiving and easy to sand, so a 220 to 320 grit window is a safe bet.
Like most oil stains, the stain pigment gets delivered into the large open pores in ash and create a darker color in the grain. With a little imagination and knowledge of how other finishing products work, you can create some exciting and dramatic finishes in ash with a little bit of stain.
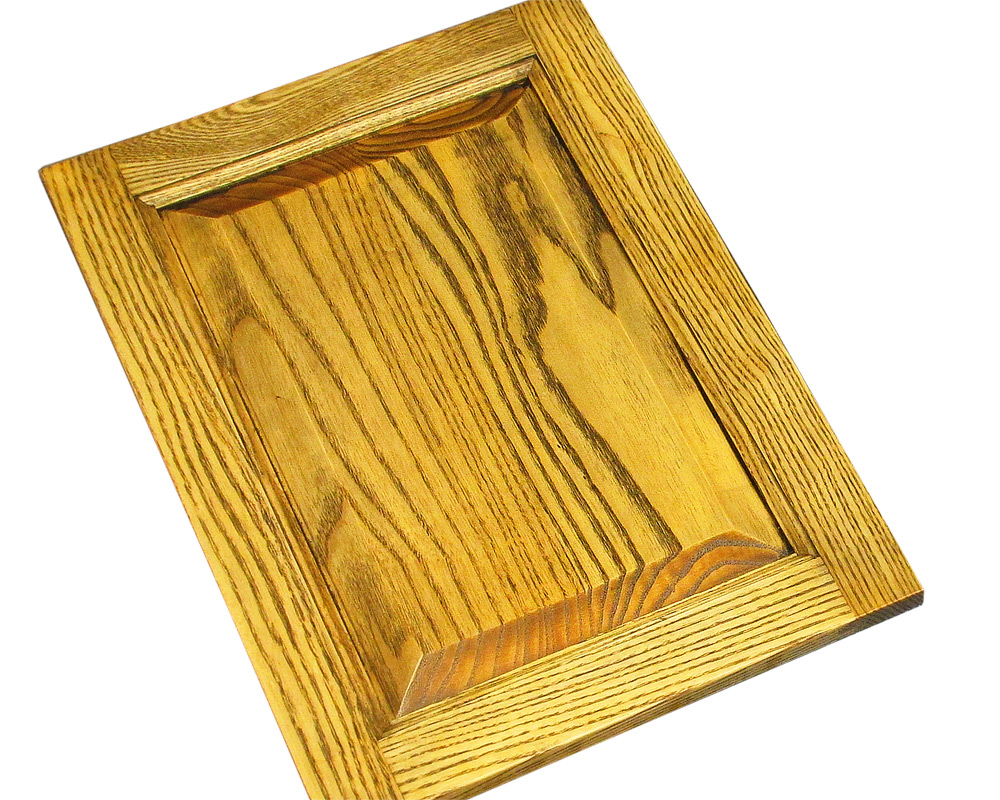
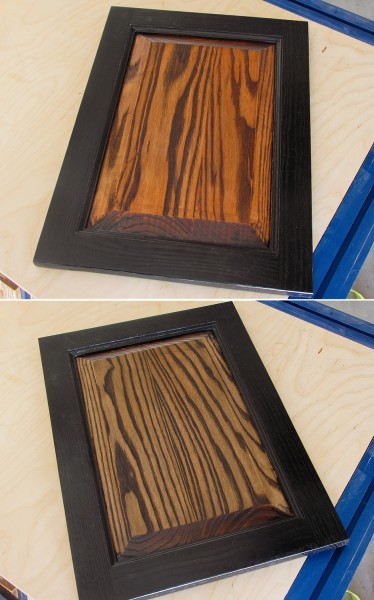
Finish #2 Basic Stained Ash with Added Dark Contrast for “Tiger Fur” Appearance

Believe it or not, this door is stained with the same maple oil stain. The difference is in the two steps that followed the stain.
Building on the concept of using a basic oil stain to color ash, you can also add extra contrast for a unique look. This door at right is stained with the exact same stain as the door above. The difference is that we applied another darker stain on top of the first color.
Products used: Old Masters Maple Wiping Stain, Zinsser SealCoat, Old Masters Spanish Oak Wiping Stain.
- Prepare the wood by sanding to 220 grit.
- Apply the first stain color of your choice; this one is Old Masters Maple Wiping Stain.
- After that stain dries, apply a coat of clear sealer (ie Zinsser SealCoat) to create a barrier.
- After it dries, apply a black oil stain; this one is Old Masters Spanish Oak Wiping Stain (contrary to what the name may suggest, it’s a nearly black oil stain). Scrape it off in the direction of the grain with something like a putty knife while the stain is still wet. You may need to also use a lint-free rag to wipe off the surface. Evaluate as you work.
- Protect the project with your top coat of choice.
Here’s what’s happening in the process. The first stain color establishes the basic overall color you want. The sealer puts a clear barrier between the two stain colors. The second stain then won’t color the wood, instead it to only deposits color into the open pores. Simply wipe it on and wipe it off while it’s still wet.
The wood takes on a darker yellow color while the pores are darkened virtually black, creating a look that’s not too unlike the coloring of a tiger’s coat of fur.
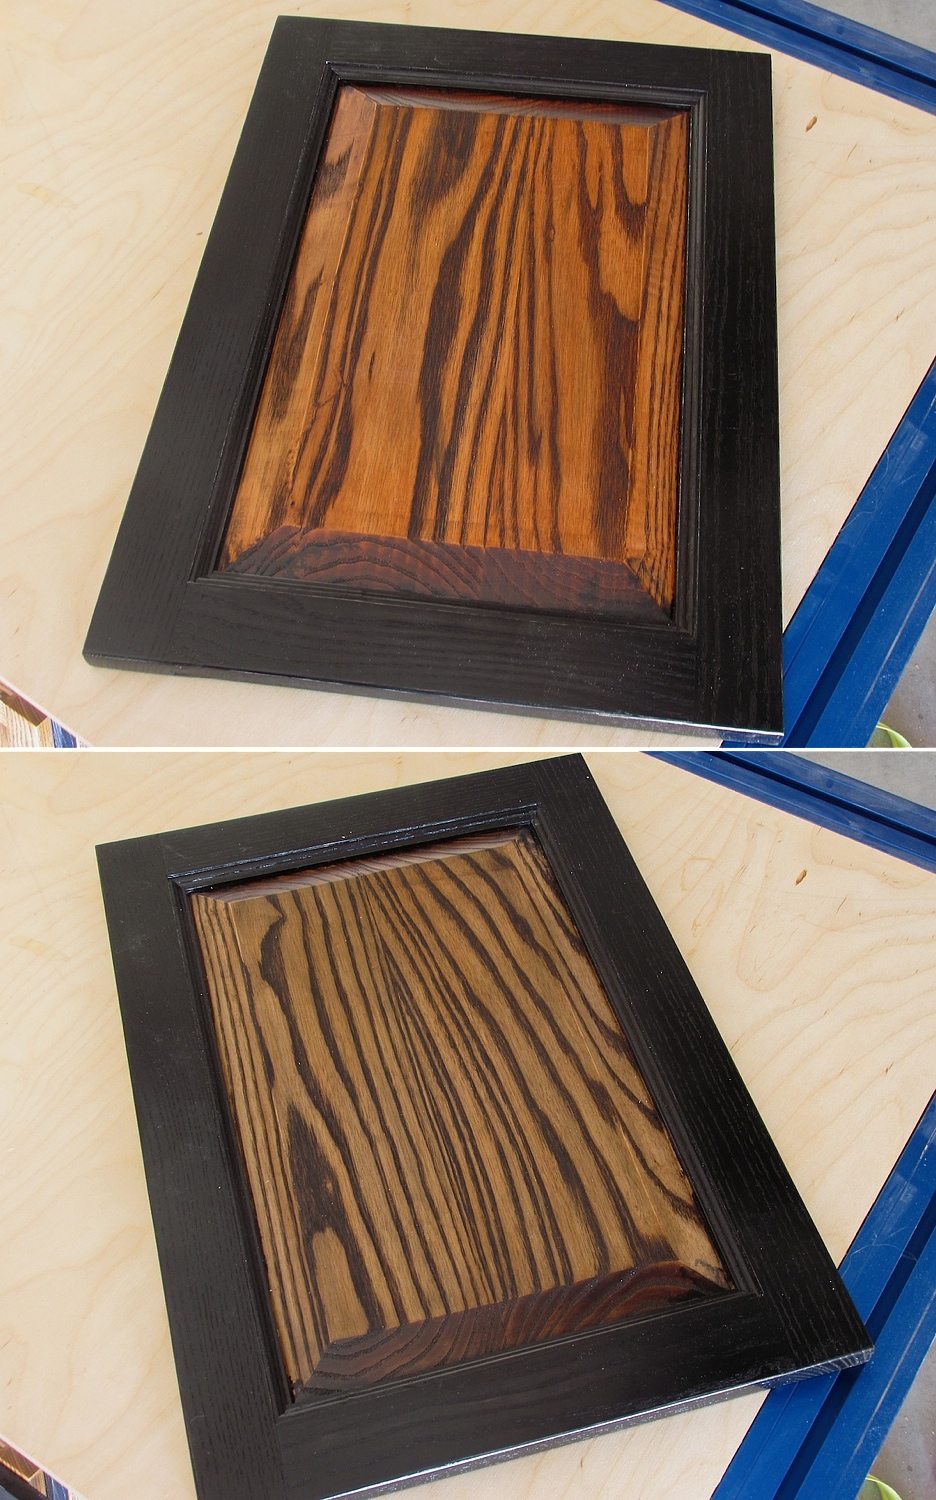
Finish #3 & #4 Dyeing Ash with Vibrant Color and Filling the Grain with Black
You can do some very wild things with dye and woodgrain filler on ash. Bright colors, solid black, and high contrast.
Ash also accepts dyes remarkably well, and it also can be grain-filled when you want to lay down a perfectly smooth topcoat. Here are a couple of samples that use colorful dye and black-tinted woodgrain filler under a lacquer clear coat.
Products used: Solar-Lux Brown Maple Dye, Solar-Lux Jet Black Dye, Zinsser SealCoat, Old Masters Woodgrain Filler, Old Masters Spanish Oak Wiping Stain.
Steps used on the panel:
- Prepare the wood as normal, sanding to 220 grit or so
- Dilute your dye by 25%, apply one coat. Let it dry. Repeat until you’ve dyed the wood to your desired color
- Apply 2 coats of Zinsser SealCoat. Allow it to dry
- Mix the woodgrain filler with the Spanish Oak stain, 2-to-1 ratio (filler to stain). Use a putty knife, scraper, rag or brush to work it into the grain
- While it is wet, scrape off the surface. The grain filler should remain in the pores. Then gently wipe off the surface with a rag, being careful not to pull filler out of the pores. Allow it to dry.
- Protect it with your favorite clear top coat finish.
Steps used to make the frame jet black:
- Prepare the wood as normal, sanding to 220 grit or so
- Apply Solar Lux Jet Black aniline dye. You may need to apply 2 coats for even coverage. Allow the dye to dry.
- Dye won’t reach down deep into the pores, so you might still see tiny spots of white showing through. Apply Old Masters Spanish Oak Wiping Stain. Wipe it on, wipe it off. Allow it to dry.
- Protect it with your favorite clear top coat finish.
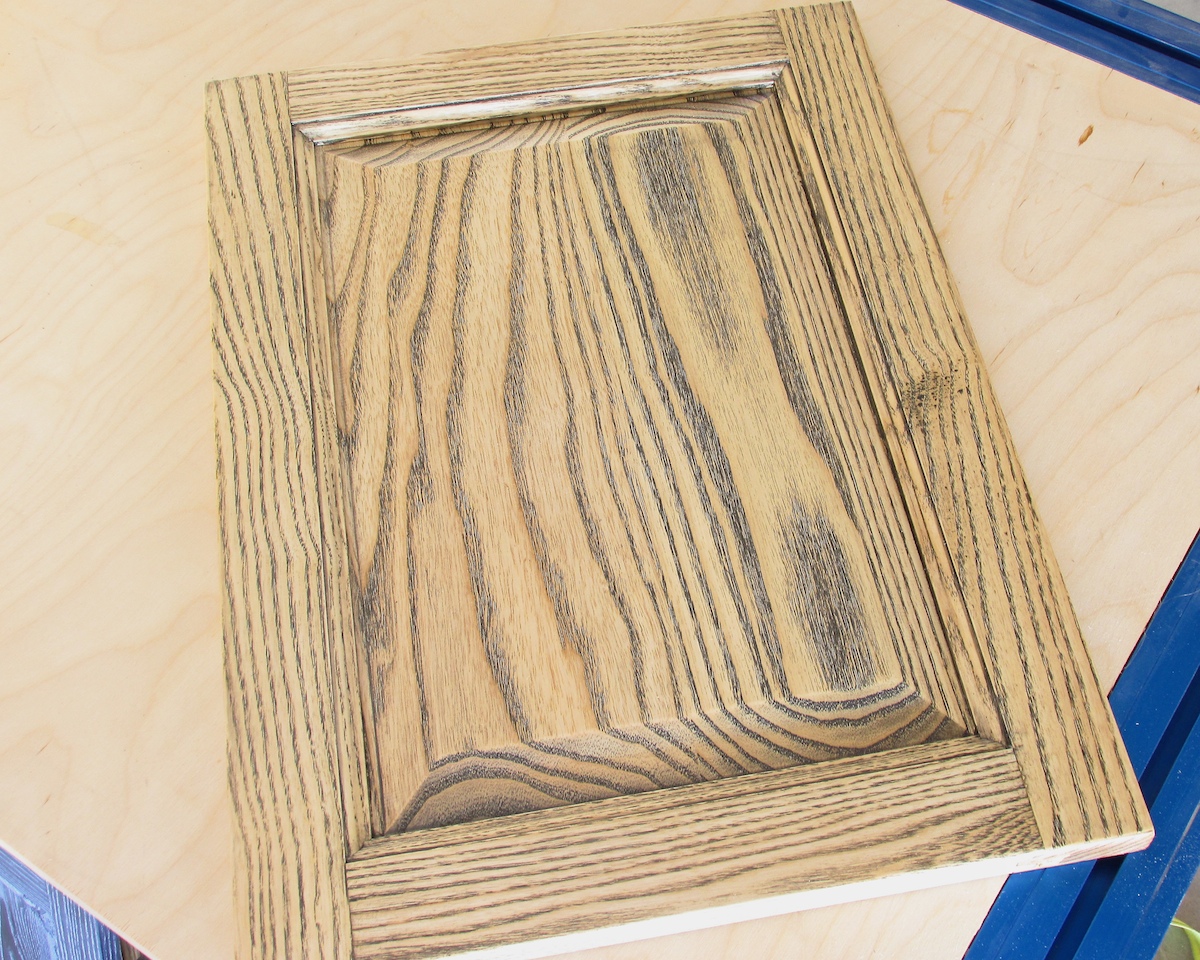
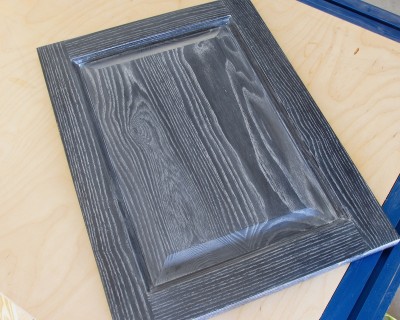
Finish #5 Enhancing the Natural Contrast with a Black Wood Grain Filler
Ash likes to take wood grain filler, too. Here we left the natural color of the wood but applied a black grain filler to demonstrate the contrast.
Why color the wood if you don’t want to? Here’s a way to improve the natural contrast in ash while keeping its main pale color.
Products used: Zinsser SealCoat, Old Masters Woodgrain Filler, Old Masters Spanish Oak Wiping Stain.
- Prepare the wood as normal, sanding to 220 grit or so
- Apply 1 or 2 coats of a clear sealer like Zinsser SealCoat. Spray if possible, otherwise use a cotton pad to briskly wipe it on and being careful not to overlap the sealer while it’s tacky
- Allow it to dry
- Mix Woodgrain Filler with the Spanish Oak stain in a 2-to-1 ratio, filler to stain.
- Apply the tinted filler with a scraper, putty knife or cotton rag and work it into the grain
- After about 5 minutes, scrape off the surface. The darkened filler should stay in the pores and mostly come off the wood. The dark color will not come off 100% at this time, but do not worry.
- Allow it to dry, then sand with a 220-grit sanding sponge. Sand until the dark color comes off of the surface wood completely. It will take some effort. However, the color will come off of the surface wood long before you happen to sand the filler right out of the pores, so do not worry if you feel like you’re sanding too much.
- If you want to fill the grain more, repeat the entire process starting with the sealer.
- Apply your protective top coat of choice, like lacquer, polyurethane, varnish or shellac.
Finish #6 Dyeing Ash Black and Adding White Contrast to the Pores
Replicate old reclaimed barnwood or a weathered wine barrel with this dying and staining technique.
Here’s a slightly different approach. You can also dye ash solid black – or build on the solid black color by making this pores white. Here’s how.
Products used: Solar-Lux Jet Black aniline dye, Zinsser SealCoat, Old Masters Pickling White Gel Stain.
- Prepare the wood as normal, sanding to 220 grit or so
- Apply the jet black dye. You may need to do this in 2 full-strength coats. Allow it to dry.
- Apply a coat of Zinsser SealCoat, allow it to dry.
- Apply the Old Masters Picklinig white Gel Stain and wipe it off right away.
- Wiping off the gel stain will take some effort to lift the white completely off of the surface wood.
- If your final color doesn’t have as much contrast as you want, apply another coat of the gel stain.
- Once the stain dries, apply your favorite clear top coat finish.
Vice President of Operations – Woodworkers Source
We’re a family-owned lumber & woodworking supply retailer with 3 delightful stores in Arizona, and 35 friendly employees.
Mark oversees the company and creates tutorials on wood finishing and woodworking tips for hardwood lumber.
Woodworkers Source is a division of MacBeath Hardwood Co.
Discussion, Questions & Answers