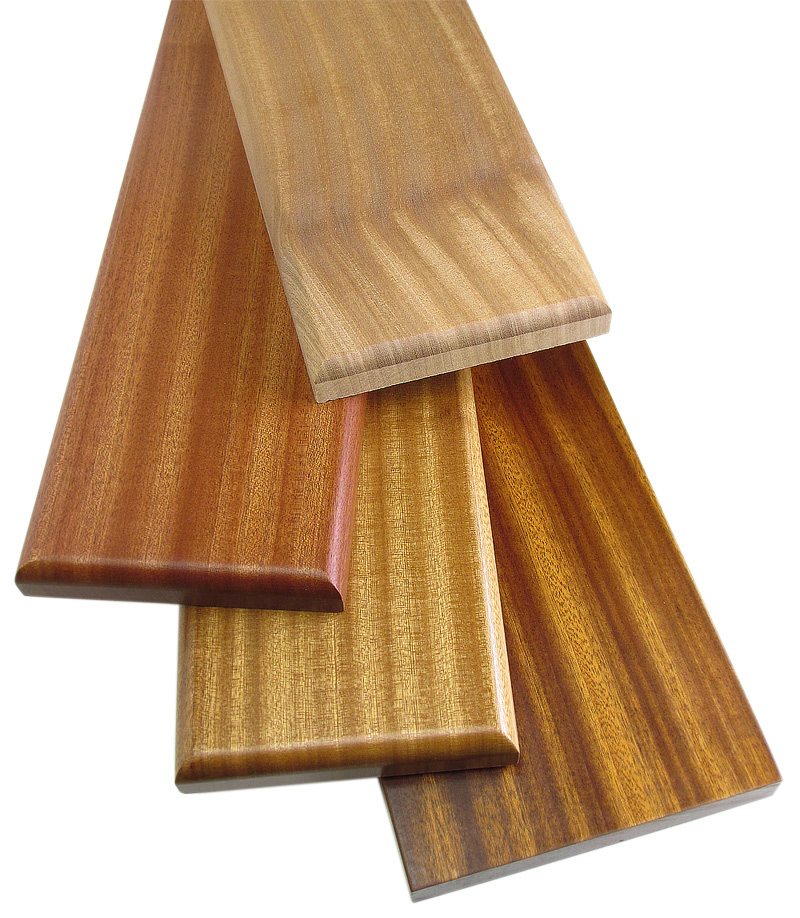
Sapele is a versatile and beautiful wood that can take many kinds of finish. Here it’s shown, top to bottom: raw, dyed & stained, clear sealer/lacquer, and Danish oil with lacquer
It’s easy to love sapele lumber, especially for furniture and cabinetry. The wood is well-mannered when it comes to machining and working it with hand tools, making it a pleasure to use in woodworking projects. But it’s also downright beautiful with flowing ribbons of stripy figure trailing from end to end of the boards. Plus, the boards tend to be big, and utterly consistent.
Somewhat like mahogany in appearance – both the color and grain can make it tough to tell a difference – but it’s a bit harder and has more golden bronze color than mahogany. And sapele is best when it’s quarter sawn because of the ribbon grain that appears.
See all sapele lumber on sale >>>
So how do you make the ribbon stripe figure look its best? There are a few ways, and in the video above we show you three pretty good methods.
Each method gives a different look, but as far as making the ribbons jump out the most, I think it’s with the Danish oil and lacquer.
Check out the video, and decide what’s best for you. Read more about these finishing processes below.
***
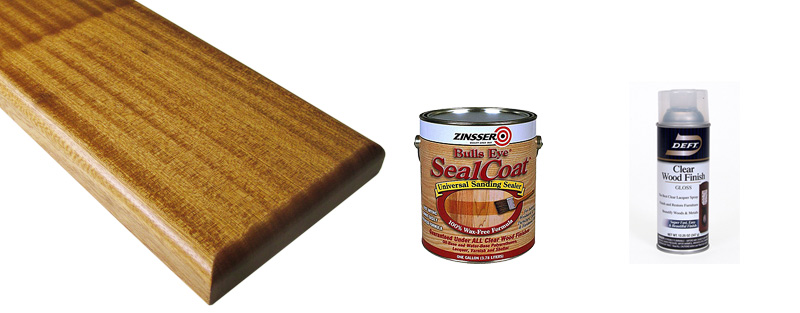
One of our favorite sealers around here is Zinsser SealCoat. It’s a dewaxed shellac that’s crystal clear. The reasons for this sealer are varied, but the best of SealCoat is that it’s a universal sealer. Any protective topcoat can go on top of it, solvent based or water based. SealCoat in particular dries exceptionally fast, which means you can sand it as quick as 10 minutes after applying it, working up 3 or 4 coats between pulling in the driveway after work and sitting down for dinner. SealCoat also sands smooth with just a couple of easy strokes, and the combination of quick-drying and fast-sanding helps you get to a baby-bottom smooth surface rather quickly. In turn, your varnish or lacquer finish that you apply on top of SealCoat has a much easier time going on smoothly. Using sealer helps you achieve a glassy finish with the least amount of elbow grease as possible. To do a simple clear or natural finish on sapele, you’ll be well served to do 3 coats of SealCoat first, sand between each coat, then shoot the final 3 coats with lacquer. You’ll get a beautiful and natural finish.
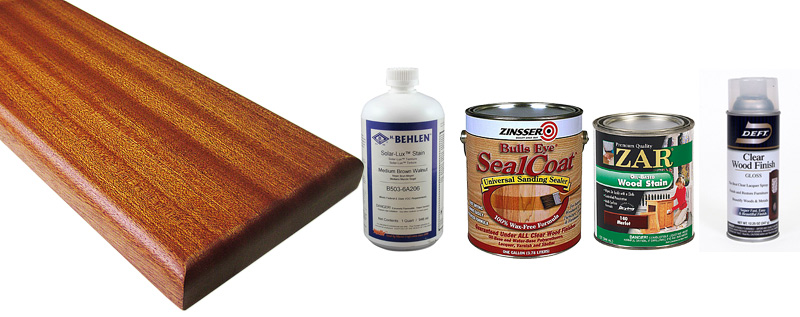
To add color to sapele with a stain, you don’t want to apply an oil pigment stain straight to the raw wood. The stain will actually reduce the shimmer in the ribbon figure, making it dull because it mainly stays on top of the wood. Instead, if you want to color the wood, use this simple process. Using an amber colored dye, thin it to about 20% dye and apply a coat. Once that dries, apply a washcoat of dewaxed shellac. A washcoat is a very thin application of sealer, in this example we thinned the sealer by 25% (1:4 ratio of denatured alcohol to SealCoat). Once the sealer has dried, use an oil stain, the shade you choose depends on the result you’re after. This sample, above, has Zar Merlot #140. Simply wipe the stain on, then wipe it off. Once the stain dries in 12 hours or so, you can then apply a protective top coat. In this case, it’s spray lacquer. But polyurethane or another varnish will work too.
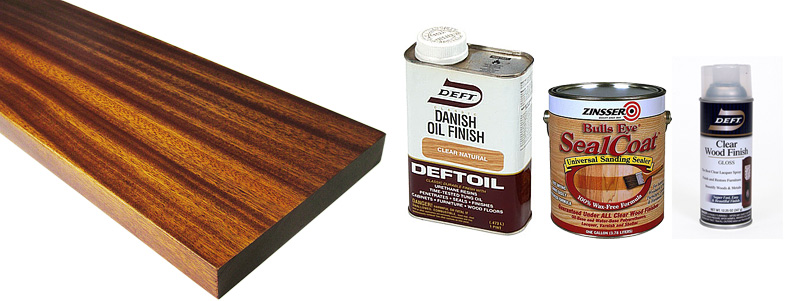
Oil finishes like Danish oil or boiled linseed oil frequently intensify the beauty in certain woods yet offer very little protection from scratches, drink rings, and other hazards around the house. Fortunately, you can apply any good, hard finish on top of these oils once they’re dry—getting the best of both worlds, beauty and protection. That’s certainly the case with ribbon stripe sapele, too. You can see how intense the contrast gets with this recipe. It’s simple to pull it off. Prepare your wood surface as you normally would by sanding to 220 grit or so, then apply the Danish oil just as it says to do on the can. Wipe it onto the surface, wait 30 minutes then wipe off the oil. Unfortunately sapele is a wood that will soak it up unevenly and send little dots and eyes of oil rising back to the wood’s surface if you apply it too heavy. But it’s not a deal-breaker. You’ll just need to keep your eye on it for a couple of hours and wipe off the dots of oil before they have a chance to dry. Once the oil dries, usually after 8 hours, apply a couple of coats of sanding sealer, level them with fine grit sand paper or finishing pads to get to a smooth surface, then spray 2 or 3 coats of lacquer. The results are stunning.
Vice President of Operations – Woodworkers Source
We’re a family-owned lumber & woodworking supply retailer with 3 delightful stores in Arizona, and 35 friendly employees.
Mark oversees the company and creates tutorials on wood finishing and woodworking tips for hardwood lumber.
Woodworkers Source is a division of MacBeath Hardwood Co.
