The Wilbur - Cutting Board Template
No Reviews Yet |
Write a Review

$16.99 ea.
Free Shipping for 3+
mix or match (48 U.S. Ground)
How Do You Want It?
Pickup In-Store
Click to choose a location
Ship to My Door
Arrives Sun, Jul 12 - Thu, Jul 16
Make an Adorable Cutting Board
Upgrade the cuteness of your cutting board with this pig cutting board template. Originally designed to promote our Cherry Cutting Board Kit, you all demanded the template be available to start your own farmland of cutting boards. You will need at least 15 of our thin cutting board strips or 8 or the regular cutting board strips to cut out this template.
Cut from 1/2" MDF on our CNC, just attach this template to your cutting board, rough cut the larger cutoffs and flush trim with your router.
Cut from 1/2" MDF on our CNC, just attach this template to your cutting board, rough cut the larger cutoffs and flush trim with your router.
| Thickness | 1/2" |
| Width | 11" |
| Length | 17" |
| Quantity | 1 Piece |
| Brand | Woodworkers Source |
-
Prepare Your Cutting Board Blank
Glue up your wood blank to a size slightly larger than the template. Give yourself enough extra material around the edges so you can trace the shape and cut it out cleanly.
Jointed, flat stock will make the process easier and help the template sit securely on the workpiece.
-
Trace the Template
Place the template on your blank and position it to highlight the wood pattern the way you want. Trace the outside shape and any handle or hanging hole openings with a pencil.
Take a moment here—this is where you decide how the final board will look.
-
Rough Cut the Shape
Cut just outside your pencil line using a bandsaw or jigsaw. Leave a small amount of material proud of the line so the router has something to trim away.
Pro tip: Stay close, but do not cut right on the line. A flush trim bit works best when it only has a little material to remove.
-
Attach the Template
Fasten the template to the rough-cut blank using double-sided tape or another secure temporary method that will keep it from shifting during routing.
Press firmly and make sure the template is fully supported before moving on.
-
Flush Trim with a Router
Using a router with a flush trim bit, follow the template to bring the cutting board perfectly to shape. Work carefully and use light, controlled passes.
If needed, reposition your hands or clamps as you go so the work stays safe and stable.
-
Sand and Ease the Edges
Remove the template and sand the board smooth. Start around 100 or 120 grit, then work up through 150 and 180 grit, or to your preferred finish level.
Ease the sharp edges and soften the handle opening for a more comfortable finished board.
-
Apply a Food-Safe Finish
Finish the board with a food-safe oil, wax, or cutting board finish to protect the wood and enrich the color.
Reapply as needed over time to keep the board looking great and performing well.
Helpful tip:
These templates are designed to help you make a clean, repeatable shape. For best results, rough cut just outside the line and let the router and flush trim bit do the final precision work.
No Reviews Yet! Write a Review
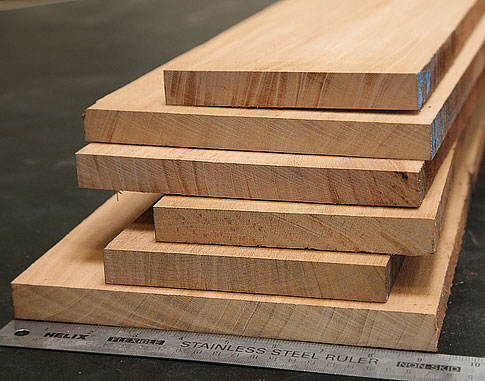
The Joys of Building with Great Woods
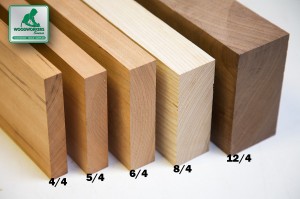
What's 4/4, 8/4, 12/4, etc.?
Understanding hardwood lumber starts right here with these wacky fractions.
Understanding hardwood lumber starts right here with these wacky fractions.

Lumber Grades Explained
If you're expecting perfect clear lumber 100% of the time, you're in for a surprise. Here's a summary of the hardwood lumber grades and what to expect from them.
If you're expecting perfect clear lumber 100% of the time, you're in for a surprise. Here's a summary of the hardwood lumber grades and what to expect from them.
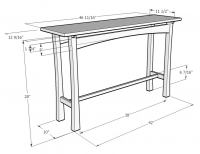
3 Steps To Figure Out How Much Lumber You Need
Board feet isn't your everyday kind of math, but these three simple steps make it easy to figure out your project.
Board feet isn't your everyday kind of math, but these three simple steps make it easy to figure out your project.

Project Planner Worksheet
Here's a handy (and free) Excel worksheet that helps you estimate the lumber needs for your project.
Here's a handy (and free) Excel worksheet that helps you estimate the lumber needs for your project.

Understand Wood Toxicity & What You Should Do About It
Are woods poisonous? Hazardous to use in cutting boards or baby cribs? Find out here.
Are woods poisonous? Hazardous to use in cutting boards or baby cribs? Find out here.

Wood Moves - Here's What You Need to Know
Wood is like a sponge, and it's always in a state of absorbing or releasing moisture to stay equalized with its environment. The problem with that is it also swells and shrinks. Here's what you need to know to protect your project.
Wood is like a sponge, and it's always in a state of absorbing or releasing moisture to stay equalized with its environment. The problem with that is it also swells and shrinks. Here's what you need to know to protect your project.