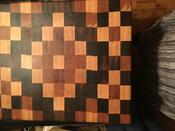
second end grain board w/instructions
I really enjoyed putting this one together.It was the second board that I've done and can see where improvments could be made.Wanted to share how I made this. Pannel 1 is not missing, I just didn't use it, so it's not listed below.
The legnth of each board is generated allowing 1/8'' an inch for the blade kerf, and an additional 1/8'' on each side to clean up uneven edges when glueing together panels. Feel free to add an extra 1/4-1/2'' to the board lengths for extra leway.
Cut List
Building the Panels
Each panel needs to be edge glued together in the order listed for the panel in the diagrams below. Use a water resistant or water proof glue.
After the glue has been cleaned off the panels and the edges have been squared it is time to cut the slices from the panels.
The next step is cutting the slices from each panel. The slice is a cross cut through the panel. Every slice should be the exact same width at 1 1/4''
<strong>Slice Count</strong><br />Panel 2 - 4 slices<br />Panel 3 - 4 slices<br />Panel 4 - 4 slices<br />Panel 5 - 4 slices<br />Panel 6 - 4 slices<br />Panel 7 - 4 slices<br />Panel 8 - 2 slices
After all the slices have been cut one final glue up is needed to assemble the cutting board. Each slice is rotated so the endgrain is faceing up and the facegrain is being glued together.
It is recomended to layout the slices before glueing them together, the slice order from left to right.
Once the slices are in order they can be glued together using the same glue type that was used to glue the panels together.
After the glue has dried and been cleaned off the cutting board you can apply extras such as rounded edges, hand holds or drill for rubber feet then sand smooth. After you've completed your cutting board it can be finished with Mineral Oil or other food safe finishes. -- Orginally posted by lalady61
No project plans available.
Project posted:
